Scrapbook Message Board is undergoing some major changes!
It will still offer occasional swaps - time frame may increase, but will also start offering monthly challenges and even technique tutorials (say that three times fast).
The first sketch challenge is posted for members to view and a drawing will be held at the end of the month to select a winner. Details can be found on the January 2016 Layout Challenge post. This contest is open to both USA and overseas participators.
Next: Design Team Call
Scrapbook Message Board is looking for a few talented individuals to start it's first design team.
Details: Right now, the design team is only open to those with United States mailing addresses. This may change in the future.
1) Membership and participation on the Scrapbook Message Board forum
2) Team position to last February 1 - April 30, 2016 It may be renewed, but as this is our first venture into design teams, I am keeping to a quarterly time frame.
3) You will be required to post a project, at a minimum, of every two weeks.
4) You will receive a paper pack and a few embellishments during the first two weeks of your design team quarter to use in a minimum of three projects. One must be a layout, one must be a card, the third is your choice (layout, card, altered item, tag, project, etc..)
5) Each design team member is to offer either a challenge (with prize of their choosing) or RAK each month of their tenure. Minimum size of prize is $2 value.
6) Each design team member will be asked to provide one technique tutorial each quarter. This may be a video link or it can be photos/text format.
7) Applicants should submit, using the pm system on Scrapbook Message Board, a notice of interest to Scraprageous. You will be required to submit photographs (jpeg) of one layout, one card and a short tutorial of some type. (ex: take photos while creating your card, using a software program or your blog to show steps/give instructions). Submissions due January 25, 2016.
8) Thank you for your interest. Feel free to send further questions to Scraprageous via the Scrapbook Message Board
Wednesday, December 30, 2015
Thursday, December 17, 2015
Christmas Creations
Wow has this year flown by! I have had fun designing the Christmas cards that we sent this year (all were different using the 6x6 paper pad instructions - loved creating them and even more fun to send!).
Below is a fun little Christmas gift box/ornament that I created using my stash of Club Scrap papers. I love how they feel and how they work in my projects! I learned how to create this little toilet paper tube box by watching a video that Xannaro1 created over on youtube!

This one isn't large, but it will hold a cute little gift. I used my sizzix to cut out some trees to create a dimensional tree for the little package. Leftover glitter sticker paper worked well for the interior.
 Some beads and glossy accents help the outside to sparkle as well as some Stickles and Liquid pearls for the tree. A Prima flower and button round out the decorations. The glittery silver paper is from an older Club Scrap kit - just stamped with a winter greeting I had on hand.
 These other boxes still need to be decorated. The glittery purple has an astronomy type pattern from the same older Club Scrap kit as the silver paper. I inked the edges of a Christmas wrapping paper roll for the larger box. The smaller box is from another Christmas wrapping paper tube - it is smaller than the toilet paper tube used for the green ornament/gift box, but still works great for earrings. I painted it with a metallic bronze and the red is from the 50's Kitchen Club Scrap Kit.

Merry Christmas!
Below is a fun little Christmas gift box/ornament that I created using my stash of Club Scrap papers. I love how they feel and how they work in my projects! I learned how to create this little toilet paper tube box by watching a video that Xannaro1 created over on youtube!

This one isn't large, but it will hold a cute little gift. I used my sizzix to cut out some trees to create a dimensional tree for the little package. Leftover glitter sticker paper worked well for the interior.


Merry Christmas!
Sunday, December 6, 2015
Sketches for 6x6 cards

Follow along for free, or sign up for free on the site to be able to ask questions. Class Starts 12/6/15 at 4 pm CST
Friday, December 4, 2015
Online Crop To Start with a Bang!
An Explosion Box! Scrapbook Message Board's Final Crop of 2015 will start off with a bang - a tutorial of how to create the explosion box shown below. Members can request a pdf of the tutorial. Membership is free, so join in the fun now! Fun Challenge prizes all week!
Top - Mine is an advent calendar based on the Names of Jesus. I added some extra pieces to the standard explosion box to accommodate my needs of 25 spaces.


 Remove the lid. Since this box is nearly 10 years old, it no longer just falls open since I store it in a closed position. In another week, it will fall open easier.
 Outer layer "explosion"

 View after removing inner layer box lid - four more flaps open

 Third interior box lid removed - lid inside is a day - just like the others and there are four more flaps. The small box inside came loose, but will is easy to restick. I used some inexpensive adhesive but most has held. I will use glue to fix anything that is loose this year.
 final 'explosion'
 Class will begin December 4, 2015 at 8 pm EST. Head on over and join in the fun! We will be using the chat box at the lower level of the main screen. To participate in the chat, you must be a site member.
Supply list - for the box only, not embellishments: 8 sheets of 12 x 12 cardstock, adhesive, method of scoring, scissors. :) See you tonight!
Top - Mine is an advent calendar based on the Names of Jesus. I added some extra pieces to the standard explosion box to accommodate my needs of 25 spaces.


Supply list - for the box only, not embellishments: 8 sheets of 12 x 12 cardstock, adhesive, method of scoring, scissors. :) See you tonight!
Wednesday, November 25, 2015
Notecard Holders
Saw how to create these great notecard holders on the Club Scrap blog. I didn't use belly bands as I wanted them fairly flat for the shelf. Mine are much more plain, but that is what I wanted. Each box will hold a different type of 'everyday' card. Made several - one in an office and these are the start of my home set. I plan to have a set of 4-5 on the shelf to allow the family easy access to cards I have made - or swapped- so they get used!
 Some of the cards in the previous post are in one of the boxes and I have an entire listing of the group of cards created with the 6x6 pages over on the Scrapbook Message Board PAD posts
Monday, November 9, 2015
Some Cards - with the 6x6 paper pad method
I found the video and tutorial for creating these over at the Best things in life are Pink blogspot. So, had to try!
Making cards has always been such a challenge, but I am loving the method she uses. It makes perfect sense to someone who always started cards, took forever - days or weeks - to figure them out, then finally coming up with something. I plan to use her method to make Christmas Cards this year!

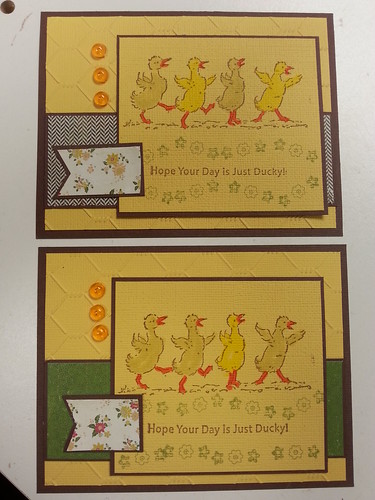
Planning to add the rest once I finish using up the 6x6 pad of paper! If following her instructions aren't your thing, I will be doing a chat on the things I figured out, aka - messed up :), when making these cards by following her video/tutorial in December during Scrapbook Message Board's Online Crop
Making cards has always been such a challenge, but I am loving the method she uses. It makes perfect sense to someone who always started cards, took forever - days or weeks - to figure them out, then finally coming up with something. I plan to use her method to make Christmas Cards this year!
Planning to add the rest once I finish using up the 6x6 pad of paper! If following her instructions aren't your thing, I will be doing a chat on the things I figured out, aka - messed up :), when making these cards by following her video/tutorial in December during Scrapbook Message Board's Online Crop
Sunday, November 8, 2015
a few first sketches
I love to use sketches for scrapping. Often, I scribble them down on paper after viewing the photos - or I use some I find online for inspiration. So, here are a couple I have made.
This first one uses 5, 4x6" photos and one 4x4" photo. I use whatever size photo is required by the pictures. I am not the worlds best photographer, so sometimes there are items to be cut out. Then I do the layouts based on content. This one was for some Birthday Photos.

This next one was just for fun - playing with the arrangements to use some fun buttons I found that match some older photos.

That is all for now - have a great day! If you have time, check out the new challenge on my scrapbook messageboard. It is a challenge that closes at midnight 11/8/2015. Prizes for the first 8 individuals who enter! All you have to do is join the board, post a project and you could win!
Sunday, November 1, 2015
Made it home!
Yes, it was a few weeks ago, but you know how travel goes - arrive home and boom! Things that have been sitting for two weeks need attention. Now that I have 'slowed' up a bit - some fun postings.
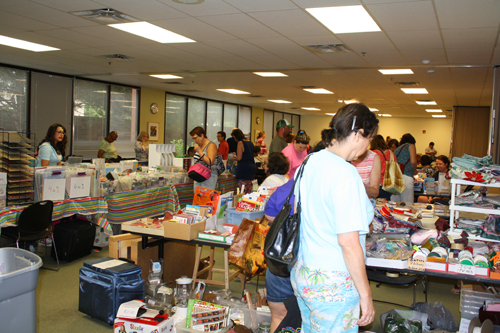
First - the crop - total blast out in PA! Thanks so much to all who attended.
Second - I am still having issues with uploading photos correctly - even after supposedly correcting them.
 Above - mini with the bamboo technique I demonstrated at our in person crop after learning over at Club Scrap. Super simple and wonderful addition to pages.

 Hmmm - guess my camera angle slipped - this is one of those uh oh photos. No idea what I was doing in this one.
 Above - some corn husk dolls dd made for my sister's wedding. She had natural type decorations and these worked out well.
 Bamboo card for challenge over at scrapbook message boards - in the crop wrap up section.
 cover of the adorable mini class - then a few pages.

 Some fall cards for a challenge over on Fia's site.

First - the crop - total blast out in PA! Thanks so much to all who attended.
Second - I am still having issues with uploading photos correctly - even after supposedly correcting them.


No idea why I cannot get this to post as it should, but it is the flower that we learned the technique of coloring the velum as another class at our in person crop.


Wednesday, September 23, 2015
Packing for a Crop or Scrapbook Crop 101
We all have done it - signed up with high hopes of accomplishing tons of pages/mini's/whatever at a crop. We start out thinking we need to take everything we own - or at least a good sampling of everything.
We figure out how to take everything, get it into the 32 totes/bags and organizers and finally into a vehicle. Whew - what a lot of work. BUT, I will be relaxing a the crop tomorrow, so it is worth it!
NOT!
Been there, done that, still refining. It is soooo easy to overpack, but is it worth it? Maybe, if you have the additional items others forgot, but do you get very much done - not usually. Or, at least I don't.
So, how do I pack for a crop? Well, for starters remember this and you will be fine!
"17 Stacks of paper, plus the sizzix big kick, plus three iris containers do not fit into a small tote"
Well, maybe they would if you have a shrink ray handy, but as I don't, I am not taking them in that manner. At this point, I try to avoid taking the big kick and cricut both as well. Usually the crop house will have some type of die cut system, or I try to get parts I want from one all cut before I leave home. No, that does not mean I cut out every die I have and require another tote! It means I take a bit of prep time and make up page kits. I have a wonderful bag from bolsa bag called Scrapbookbuzz. Google has been unable to locate a mfg for me, so I will get some photos taken. It holds 25 page kits plus room for a few extra items. If I could find another, I would purchase! I got lucky and found it at a scrapbook garage sale in Minneapolis, MN (visiting) for $5!
Enough about the bag - on to the page kits! I create page kits on days when I just don't want to actually create, but want to work with supplies. Or, when new photos come. So, once assembled (my assembly is listed on my blog back in June of 2014 - Page Kit Anatomy and there are lots of you tubes and such out there on kit assembly). I either put the page kit into my Scrapbookbuzz bag (if there is an open page) or into a 2.5 gallon hefty bag and then into a cube designed for page kits! I don't just use page kits for crops, I use at home as well. It just helps me.
So, page kits assembled - I make sure there are 25 in my bag. However, I want to be sure I don't run out of things to do, though keep with my plan to reduce the number of items I carry, so I have two projects that will go with me. One can be done in an hour or so, the other I know will take about 3 days. Both fit into the size of a single Iris container, with room to spare. Can you guess what that Iris container is? It is my space for "extra's" I just might want. I haven't completely done away with a just in case set of items, but I now limit them to a single Iris container (or in this case, it is a Club Scrap Pizza box - but similar storage area) that fits into my medium tote bag that accompanies me to all crops. Actual name, discovered via google, is Crop-n-Style Navigator. I love it because it is light weight enough, when loaded, for me to move to above my waist for loading.
The medium tote bag is for anything that isn't in the page kit. It could be some wooden stamps I want for a mini album, it includes my tape gun, cutter, scissors, and anything else I may want, tool wise. I used to carry a photo box, but with my page kit arrangement, I don't take it all the time now. I also have room in the medium tote for one pizza box of paper if I would like. Not sure if it is going to the PA crop or not - I really like my page kits for this one.
The above isn't my baby bug, but it is what I carry - the Original Cricut Cutter. It works perfect for small spaces at crops. I just add the gypsy (rather than the jukeboxes I used to take) and it works wonderfully for me. No additional space with computer (or additional outlets) required.
I do take either my sizzix, slice or cricut. More often it is the Cricut and gypsy. Internet is unreliable at some crops and I want to be able to cut out my lettering. So, the baby bug and gypsy travel with me (the large cricut stays at home on its perch unless I feel there is a reason to bring along). Why take a machine when so many locations have them? I don't like to feel like I am hogging the machine. I plan to cut all my lettering out at the crop, so unless no one else has anything to cut out, I like to have my mats and machine at my disposal whenever I want them. Plus, the baby bug is small enough to sit at my table and be used and still lets me have space to work. Unless I have less than 3' of work space, the baby bug travels with me. I love the Sizzix to work at home, but those dies are too heavy to travel for short crops. Plus, I have a great work space to precut lettering at home if I want one of the three sizzix letter sets.
Packing time arrives - I take my Crop-n-style bag, my Scrapbook buzz bag and my Cricut bag. I am ready to crop. If I get everything done (I seldom do), I will have over 50 pages completed plus two projects! One is a simple hinge mini album, the other is a kit I bought from Jim, The Gentleman Crafter - a trophy and mini album. I won't be able to put the Trophy mini into my bag, but I have plenty of room if I do complete it on the road.
My check list for the crop-n-style bag:
scissors
cutter plus blades
embossing board plus bone folder or embossing stylus
pens/pencils/straight cutter/paper piecer/glue pen/filing tools (emery board works if I forget them)
box of extras
box of paper
adhesive roller and extra adhesive (liquid and sticky types)
Ink pads and ink applicator/foam pads
Stamps (if any are needed other than the ones in kits)
Gypsy plus cords
side pocket - box of tic tac type containers of brads
side pockets - paper punches
I don't usually do messy items at crops - not enough space to set things to dry, so I will review my page kits one more time - see if there are notes for any tools. If not, that is it and I am ready to crop!
Wednesday, September 9, 2015
A new mini has begun!
It all started after the recent cleaning/reorganizing/moving of my scrap area. It only moved about 20' down, but wow was it a ton of work!
Loving the new space and new areas to scrap in. I have my original 8' table, another 5' table (which has a sewing machine), two 3' tables - one is always clear, the other holds my laptop, speakers, etc. and even another 4' table space for the cricut and laser! Papers are labeled, instructions books and samples all have homes and all the memorabilia that I have been sorting still has homes. The biggest change - other than doubling in size - my old scrap paper sorters have changed. They are now two of my 3' tables - each with 16 drawers. They hold a ton and help with sorting more than I had imagined they would.
Just think- all your stickles, glitter glues and glue pens in a single drawer. Same for mists/stains/sprays, daily tools, colored pencils and markers, punches (though these take multiple drawers and my very large We R Memory Keepers 8 punches don't fit), stencils, flowers, deco scissors, etc.. They all have their own homes that are larger than before, easier to access and labeled!
So, with all this new space (yes, I do have to remember to clean it after each project. It is amazing - I tend to use whatever space I have!), I am having fun creating!
While cleaning, I found this fun mini that was sent to me in a swap over on Scrapbook Message Board. If I had to guess - I would guess Candy created it!


Anyway - using it as inspiration, I created this fun mini using "leftovers" from my September Club Scrap Kit. The Bamboo on front is a technique I learned from the Transformations Scrap Rap. I can't believe I didn't realize that the Scrap Rap was there for each line! I am going to be doing some reading on back posts this afternoon! So happy it is raining.

It is not completed yet (as you can see - no photos or embellishing done just yet. I prefer to embellish as I am adding photos).

each page has two tags - one large and one small and a flap. After I add the photos, we will see how it looks!


Wednesday, September 2, 2015
New kit arrived!
My September Club Scrap kit arrived with the mail today!
 Step one - after looking at all the wonderful items - choose the photos and layouts I want to create. I don't always create everything. I have a few times, but now I prefer to gather what I want and create some of the layouts as created (or at least close :D)
 Below are my results. 5 wonderful pages - journalling completed and they are even in the page protectors! Off to put into albums now!


Subscribe to:
Posts (Atom)